一、加载图片的方式:
imageNamed:
可以从项目中直接加载,也可以从Assets.xcassets中加载
self.imageview.image = [UIImage imageNamed:@"图片名"];imageWithContentsOfFile:
只能从项目中加载
NSString *path = [[NSBundle mainBundle] pathForResource:@"图片名" ofType:@"后缀"];
self.imageview.image = [UIImage imageWithContentsOfFile:path];
二、pch文件:
pch文件里的内容可以被项目中的所有文件共有。
注意事项:
- pch文件使用前需要先编译。
- 需要做一些判断,例如:判断是否有c文件,如果有,则不导入oc文件及语法。
- pch文件名称和项目名称一致。
使用步骤:
(1). 在项目中创建pch文件。
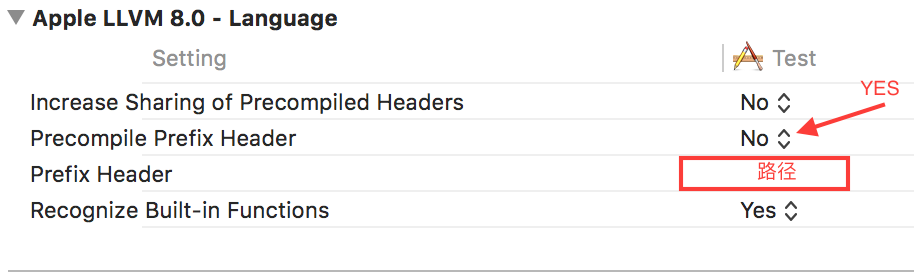
(2). 在target的
Apple LLVM-Language中设置Precompile Prefix Header为Yes。(3). 在target的
Apple LLVM-Language中配置相应的pch文件地址。
作用:
- 存放公用的宏。
- 存放公用的头文件。
- 自定义Log输出日志。
三、info.plist文件:
从info.plist文件获取应用版本的方式一:
从info.plist文件获取应用版本的方式二:
四、从代码加载指定的storyboard文件:
- 在AppDelegate.m文件的(BOOL)application:(UIApplication *)application didFinishLaunchingWithOptions:方法中(注意:取消Targets->Deployment Info中所指定的storyboard文件):
五、ViewController中loadView方法:
- 作用:加载控制器的View。
- 调用时间:当控制器的view第一次使用的时候就会调用。
- 具体使用:
- 不会再调用[supper loadView]
- 只要想自定义控制器的view就调用这个方法(如下代码,其中MyView为自定义的view)
六、背景图片的拉伸:
控件背景在拉伸的情况下可能会出现失真的效果(锯齿),如下:
可以用代码进行处理
方式一:

>
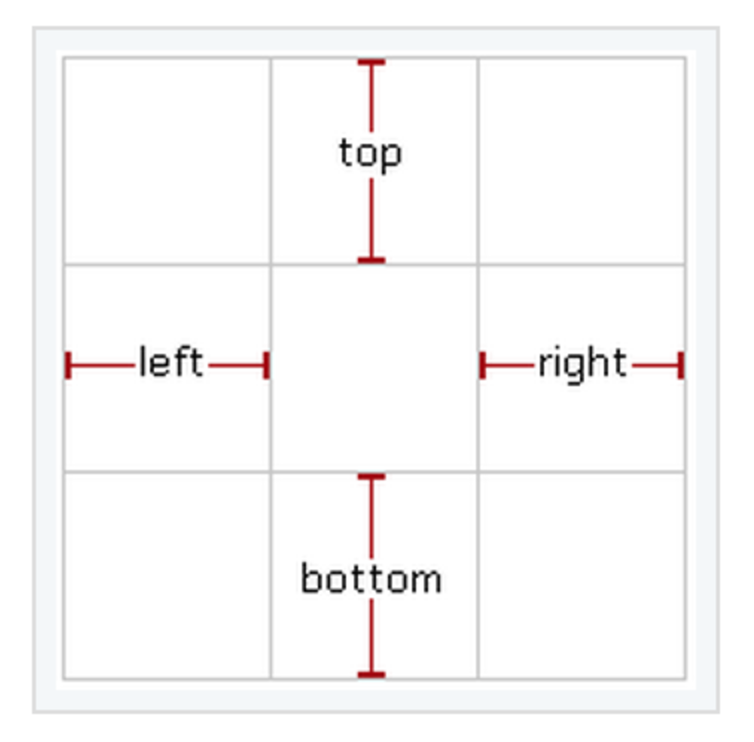
其中第5行代码的上、右、下、左分别代表被保护不被拉伸的区域,具体如下:
进行代码拉伸后的效果如下:
方式二:

>
这种方式只需要提供左边和上边的被保护区域,然后就可以计算出另两个被保护区域:
- 右边被保护的区域 = 图片的宽度 - 左边的被保护区域 - 1
- 下边被保护的区域 = 图片的高度 - 上边的被保护区域 - 1
这样主可以在中心形成一个1x1的拉伸区域。
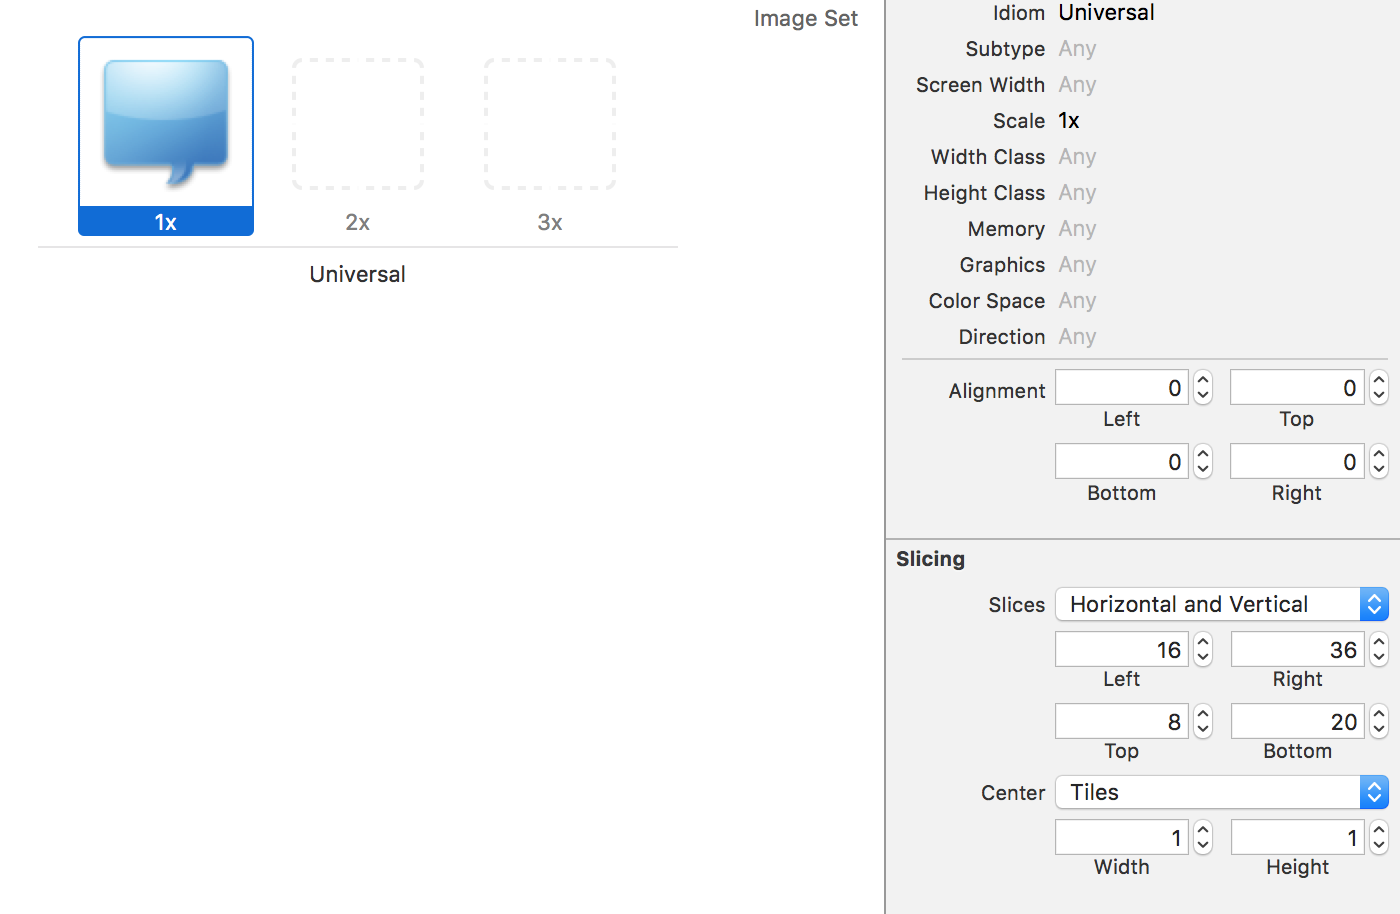
方式三:
直接选择图片,然后在右边的Slicing中选择拉伸模式即可自动进行拉伸(也可自行调整相应的保护值),如下图:
七、KVC:key value coding(键值编码)
应用场景:简单的字典转模型。—>框架:MJExtension
设置值:
>
取值:
>
字典转模型:
>
模型转字典:
>
取出数组中所有模型的某个属性值
八、KVO:key value observing(键值监听)
- 当某个对象的属性发生改变的时候用KVO进行监听
- 使用如下:
>
并使用以下方法进行临听:
九、适配
系统适配-不同的系统版本适配
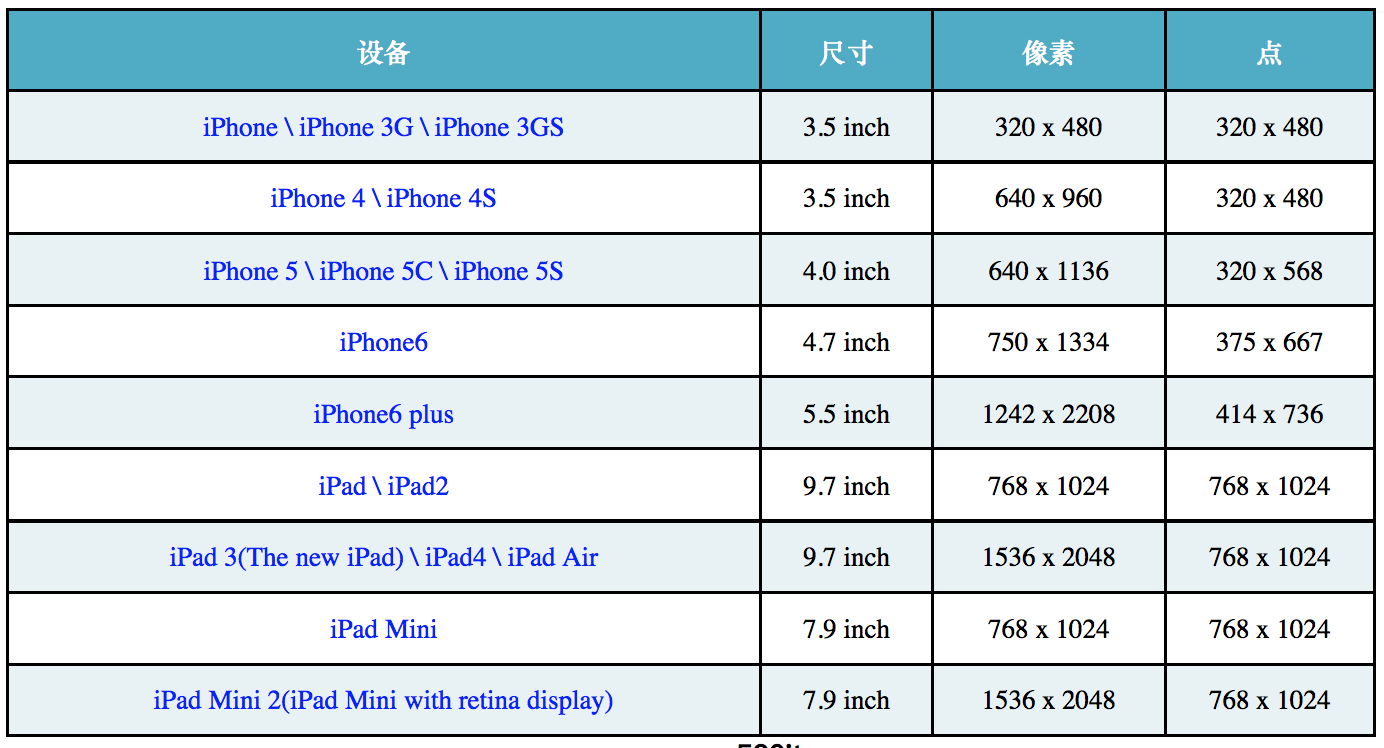
屏幕适配-不同的屏幕尺寸适配
- iPhone的尺寸:3.5、4.0、4.7、5.5
- iPad的尺寸:7.9、9.7、12.9
- 屏幕方向:横屏、竖屏
屏幕适配技术
Autoresizing:解决子控件和父控件之间的相对关系问题
在代码中实现如下:
>
给view设置需要拉伸的方向或者宽高即可。

或者在xcode中对需要拉伸的界面进行如下设置:

<img src="iOS学习笔记/fit2.png"  width="300" height=300/>
AutoLayout:
自动布局的核心公式:
>
界面实现: 代码实现:很少用,太麻烦。注意使用代码方式需要禁止将Autoresizing转为AutoLayout约束,使用以下代码禁止:
>
VFL实现:Visual Format Language,可视化格式语言:

<img src="iOS学习笔记/fit3.png"  width="200" height=100/>
- Masonry框架实现:https://github.com/SnapKit/Masonry
十、UITableView
注意点:
若UITableView的数据不够一页,剩余的界面部分会出现分隔线,解决方法:
(1).将tableview的样式必成Grouped的。
(2).给tableview设置一个footer view。
>
性能优化:
方式1:
在(UITableViewCell )tableView:(UITableView )tableView cellForRowAtIndexPath:(NSIndexPath *)indexPath方法中:
>
方式2:常用于自定义Cell
定义flag:
NSString *ID = @"flag";在viewDidLoad方法中进行注册
>
在(UITableViewCell *)tableView:(UITableView *)tableView cellForRowAtIndexPath:(NSIndexPath *)indexPath方法中:
>
>
数据刷新:
全局刷新:
[self.tableview reloadData]局部刷新:
>
左滑添加多个操作按钮:
>
编辑模式:
单选模式:
>
多选模式:
>
十一、UIApplication
UIApplication的常用属性:
- applicationIconBadgeNumber:应用程序图标右上角的红色提醒数字.
- networkActivityIndicatorVisible:状态栏的网络加载图标(小菊花)
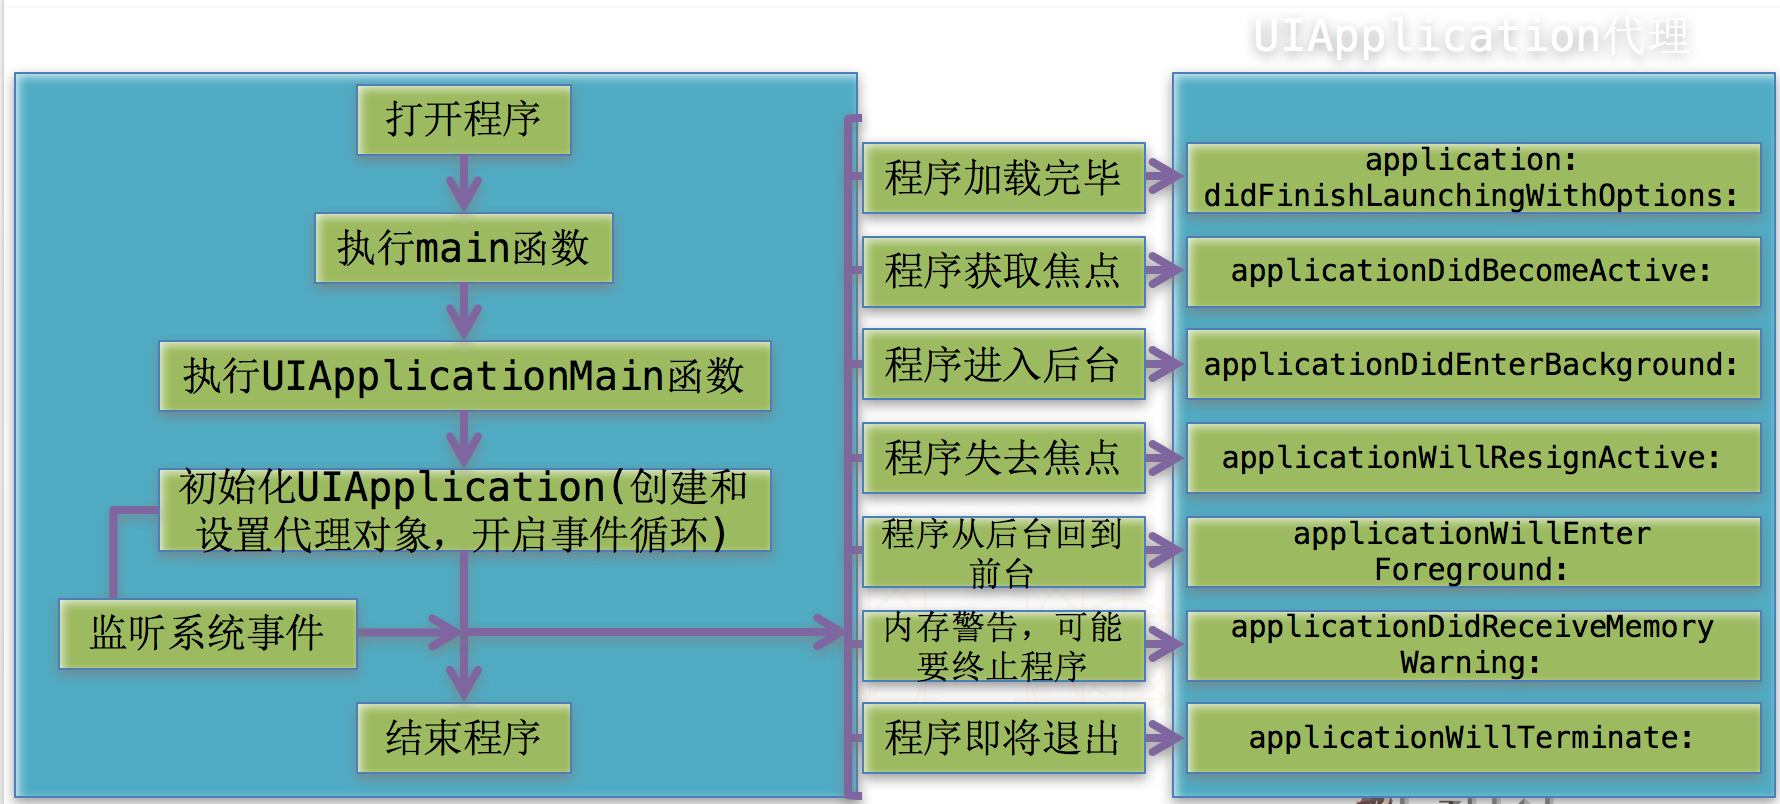
UIApplication的代理事件:
当应用程序启动完毕时调用
>
当应用程序将要失去焦点时调用
>
当应用程序进入后台时调用
>
当应用程序进入前台时调用
>
当应用程序获取焦点时调用
>
当应用程序退出时调用
>
当应用程序收到内存警告时调用
>
应用程序启动流程:
执行main函数
执行UIApplicationMain,创建UIApplication对象,并设置UIApplication它的对象
开启一个事件循环(主运行循环,死循环:保证应用程序不退出)
加载info.plist(判断info.plist中有没有Main,如果有,加载Main.storyBoard)
应用程序启动完毕(通知代理应用程序启动完毕)
十二、UIWindow
代码创建Window及ViewController:
在(BOOL)application:(UIApplication *)application didFinishLaunchingWithOptions:方法
>
通过StoryBoard加载控制器:
>
通过xib文件加载控制器:
>
注意,如果UIViewController和xib文件单独创建,需要做以下操作:
1. 需要设置xib中的UIView的File`s Owner为UIViewController
2.右击File`s Owner,将其中的view和UIView控件关联
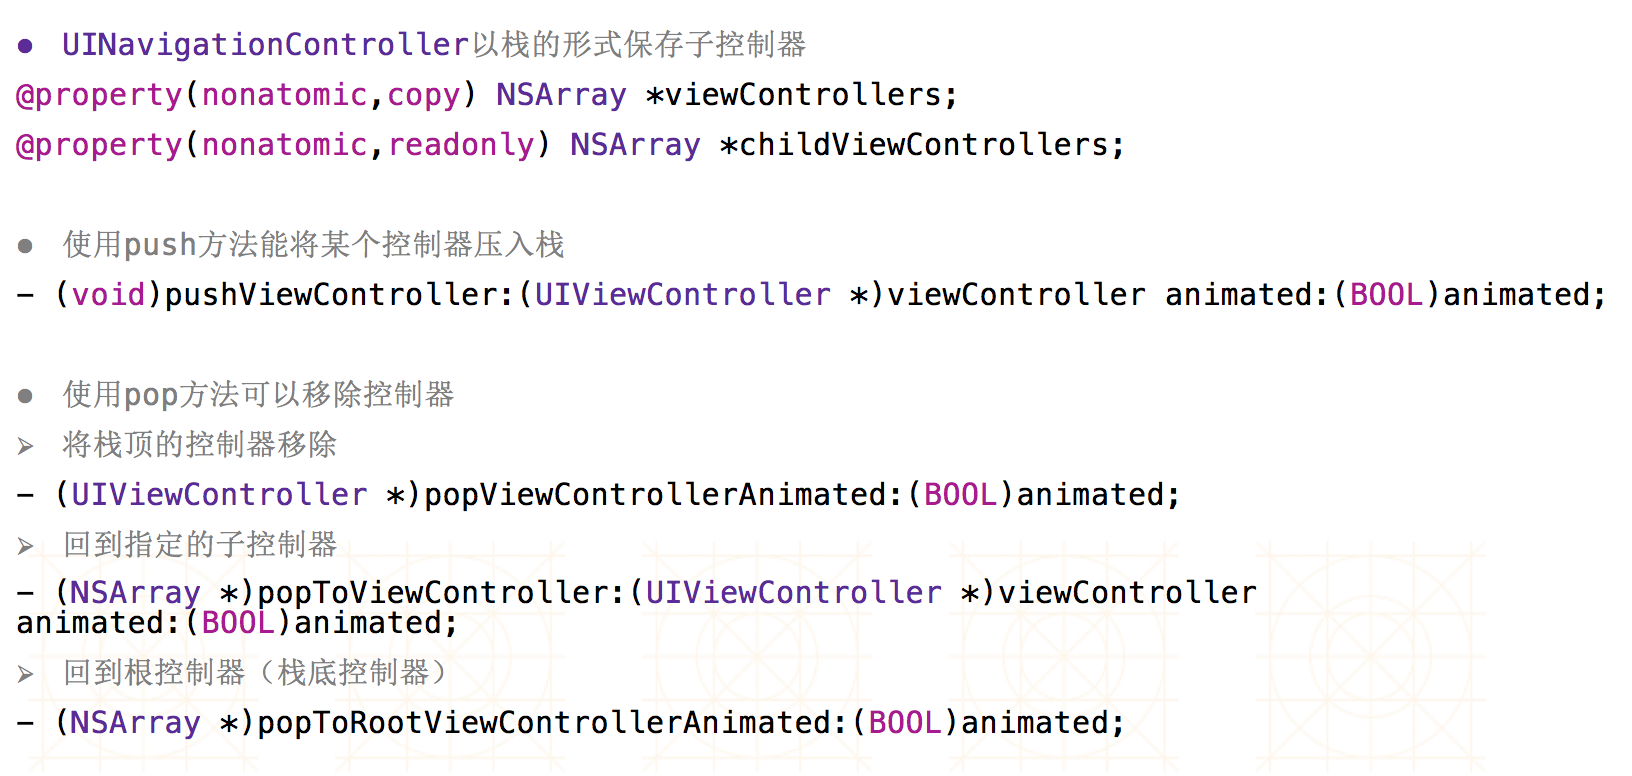
十三、多控制器:UINavigationController
使用步骤:
- 1.初始化UINavigationController
- 2.设置UIWindow的rootViewController为UINavigationController
- 3.根据具体情况,通过push方法添加对应的子控制器
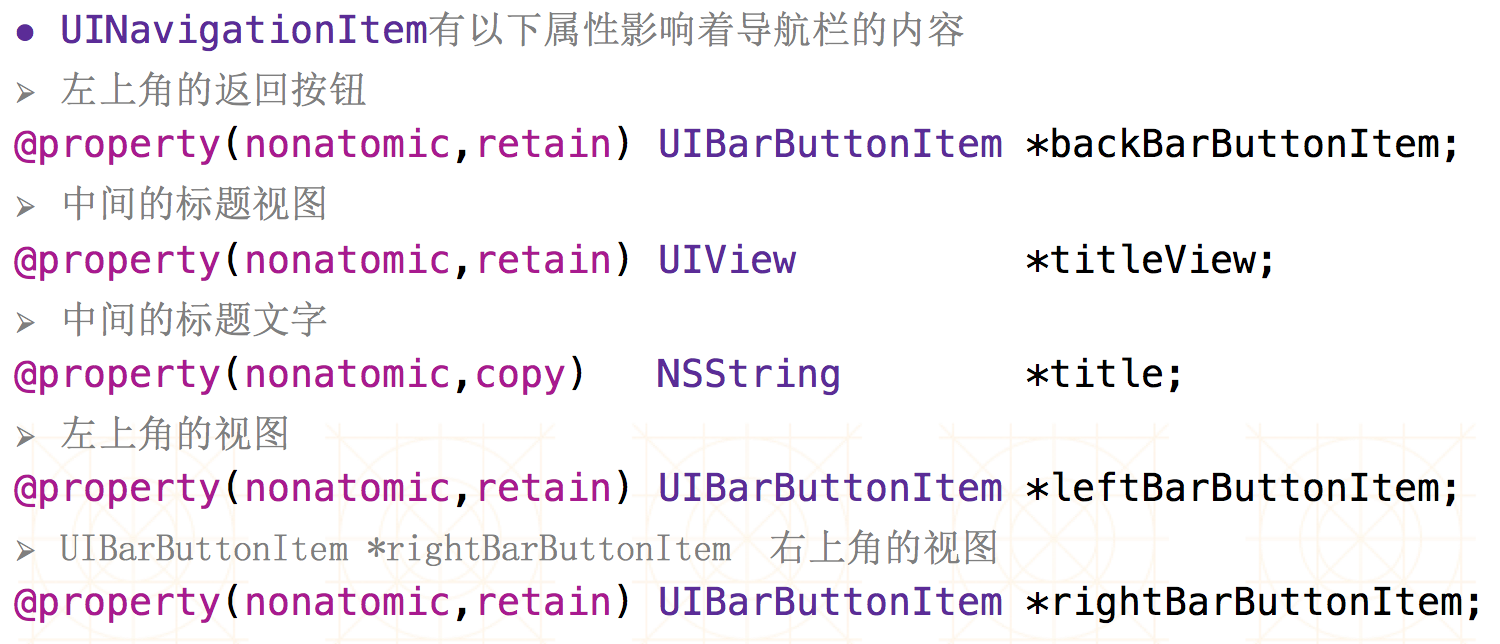
UINavigationController常见属性:
UINavigationController标题属性:
十四、控制器生命周期:
当控制器加载完毕时调用
>
当控制器的view即将显示的时候调用
>
当控制器的view显示完毕时调用
>
当控制器的view将要布局子控件的时候调用
>
当控制器的view布局子控件完毕的时候调用
>
当控制器的view即将消失的时候调用
>
当控制器的view消失完毕的时候调用
十五、OC中BOOL和bool的区别:
BOOL是一种带符号的字符类型(
signed char)的类型定义(typedef),它使用8位的存储空间。通过#define命令把YES定义为1,NO定义为0。注意:OC并不会将BOOL作为仅能保存YES或NO值的真正布尔类型来处理。编译器仍将BOOL认作8位二进制数,YES 和 NO 值只是在习惯上的一种理解。
例:如果不小心将一个大于1字节的整型值(比如short或int)赋给一个BOOL变量,那么只有低位字节会用作BOOL值。如果该低位字节刚好为0(比如8960,写成十六进制为0x2300),BOOL值将会被认作是0,即NO值。bool只有true和false的区别,即0为false,非0为true。
十六、initialize和load方法的区别:
- initialize方法:在 第一次初始化这个类之前 被调用,我们用它来初始化静态变量。先调用类中的,再调用类别中的(类别中如果有重写);如果该类只是引用,没有调用,则不会执行initialize方法。
- load方法:会在加载类的时候就被调用,也就是 ios 应用启动的时候,就会加载所有的类,就会调用每个类的 + load 方法。且在main函数之前,先调用类中的,再调用类别中的(类别中如果有重写)。
十七、instancetype和id的区别:
- instancetype用来在编译期确定实例的类型,而使用id的话,编译器不检查类型, 运行时检查。
- id可以作为方法的参数,但instancetype不可以;instancetype只适用于初始化方法和便利构造器的返回值类型。
十八、OC访问修饰符:
属性访问符:
@private: 私有 被@private修饰的属性只能在本类的内部访问。只能在本类的方法实现中访问。
@protected: 受保护的(默认) 被@protected修饰的属性只能在本类和本类的子类中访问.。只能在本类和子类的方法实现中访问。
@package: 被@package修饰的属性 可以在当前框架中访问。
@public: 公共的。被@public修饰的属性 可以在任意的地方访问。
说明:
在interface中声明的成员变量默认是protected。
在implementation中声明的成员变量,默认是private(在没被import的情况下,即使加@public仍然无法被他人引用)。
@property 用于生成getter与setter的声明,只能用于interface中。
十九、OC属性修饰符:
修饰符分类:
- 自定义getter | setter方法名修饰符 : getter和setter
- 原子性修饰符:atomic | nonatomic
- 读写性修饰符:readwrite | readonly
- setter相关修饰符:assign | retain | copy
方法名修饰符:
getter=<getMethodName>,setter=<setMethodName>:指定该属性所使用的getter和setter方法的名称一般用来修改BOOL类型的getter方法。
原子修饰符:
- atomic:原子属性(默认),为setter方法加锁,线程安全,但比较耗性能。
- nonatomic:非原子属性,不为setter方法加锁,非线程安全,适合内存小的移动设备。
读写性修饰符:
- readwrite:表明这个属性是可读可写的,系统为我们生成这个属性的setter和getter方法以及下划线开头的成员变量。
- readonly:表明这个属性只能读不能写,系统只为我们生成一个getter方法及下划线开头的成员变量,不会创建setter方法。
- 注意:如果手动实现了setter和getter方法则不会再生成下划线开头的成员变量。
setter相关修饰符:
retain:针对对象类型进行内存管理(非ARC)。当给对象类型使用此修饰符时,setter方法会先将旧的对象属性release掉,再对新的对象进行一次赋值并进行一次retain操作。
assign:表示直接赋值, 基本数据类型、枚举、结构体(非OC对象) class类型。当一个对象被销毁时,指针不会被清空(所以修饰对象时容易造成坏内存 (非ARC下会用这个修饰对象)。
copy:以前主要用在NSString类型和Block,建立一个索引计数为1的对象,然后释放旧对象。
strong:除NSString\block以外(注意!这是以前的说法)的OC对象 , 强引用以保证属性作用域结束后不被销毁。
weak:当一个对象被销毁时,指针被清空。一般用在已经添加到父控件中的控件,因为父控件会对子控件进行引用,也就是retain,所以自己的作用域结束之后不会被释放
注意:
(1).系统默认属性是assign。retain是指针的复制,copy是内容的复制。
(2).用copy修饰字符串时:在setter方法中会判断 传入的字符串 是否是可变的 如果是可变的就分配新的内存再赋值 如果是不可变的就直接赋值地址 而实际上开发中其实大量使用的是不可变的字符串 所以最好使用 strong 修饰字符串,可以提升性能(减少一次判断)
(3).用copy修饰Block时:
非ARC环境下:
>
ARC环境下:
>
总结(ARC环境):
>
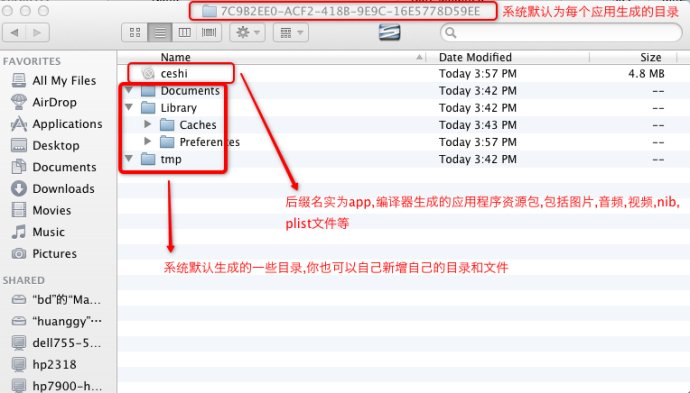
二十、iOS文件系统
- iOS程序为沙盒机制,APP只能访问自己目录下的文件,不能直接访问其他目录内容,每个APP默认都会创建以下目录结构Documents、Library、tmp。
- NSBundle:包含所有的资源文件和可执行文件,并且是只读文件目录。
Documents:存放应用程序产生的数据,会被itunes备份同步;
Library:包含两个子目录:Caches 和 Preferences:
- Preferences:包含应用程序的偏好设置文件。您不应该直接创建偏好设置文件,而是应该使用NSUserDefaults类来取得和设置应用程序的偏好,会被itunes备份同步。
- Caches:用于存放应用程序专用的支持文件,保存应用程序再次启动过程中需要的信息,不会被itunes备份同步。
tmp:存放临时数据,当不在用时应该删除掉临时文件,系统也有可能在程序不运行时删除该文件夹下内容。
<img src="iOS学习笔记/file1.png" width="400" height=300/>
获取方式:
NSBundle:
NSString *path = [[NSBundle mainBundle] pathForResource: ofType: ]];
注意:NSBundle中的文件只能进行读取不能进行更改,即使对NSBundle中的文件进行更改,其实是更改内存中其所对应的文件,实际的文件是没有被更改过的;
Home目录:
NSHomeDirectory()Documents目录:
方式1:
NSHomeDirectory().stringByAppendingPathComponent("Documents")方式2:
>
Library目录:
方式1:
NSHomeDirectory().stringByAppendingPathComponent("Library")方式2:
>
Caches目录:
>
- tmp目录:
NSTemporaryDirectory()
二十一、iOS文件操作:
获得NSFileManager:
NSFileManager *fileManager = [NSFileManager defaultManager];判断文件夹/文件是否存在:
[fileManager fileExistsAtPath: ];创建文件夹:
>
创建文件的方法:
>
删除文件或文件夹:
[fileManager removeItemAtPath:* *error: ];注意:
- Path为文件夹/文件的路径全名
二十二、iOS归档:
自定义归档对象需要实现NSCoding协议。
自定义归档对象重写(void)encodeWithCoder:(NSCoder *)aCoder方法指定将那些属性进行归档。
重写(instancetype)initWithCoder:(NSCoder *)coder指定如何读写归档的对象属性。
>
读写操作:
二十三、自定义UITableViewCell:
自定义等高Cell:
代码:
frame方式:
第1步:在自定义的UITableViewCell类的
(instancetype)initWithStyle:(UITableViewCellStyle) reuseIdentifier:(NSString *)方法中添加所有的子控件;第2步:在
layoutSubviews方法中设置所有子控件的frame(进行子控件的位置布局);第3步:添加一个数据模型属性,当有模型数据设置进来的时候,进行数据绑定。例如:
>
注意:在UITableViewController类中的`(UITableViewCell *)tableView:(UITableView *) cellForRowAtIndexPath:(NSIndexPath *)`设置模型数据,将数据和控件绑定。autolayout方式:
- 使用Masonry在
initWithStyle或layoutSubviews对相关的控件添加约束。
xib:
第1步:创建xib文件,并和自定义的UITableViewCell类绑定,并设置复用的ID。(或者直接在viewDidLoad方法通过
[self.tableView registerNib:[UINib nibWithNibName:@"StatusCell" bundle:nil] forCellReuseIdentifier:ID1]方式进行利用优化)
第2步:在自定义的UITableViewCell中设置模型数据时进行数据绑定。
第3步:在UITableViewController的(UITableViewCell )tableView:(UITableView ) cellForRowAtIndexPath:(NSIndexPath *)方法中从xib创建自定义的UITableViewCell。
>
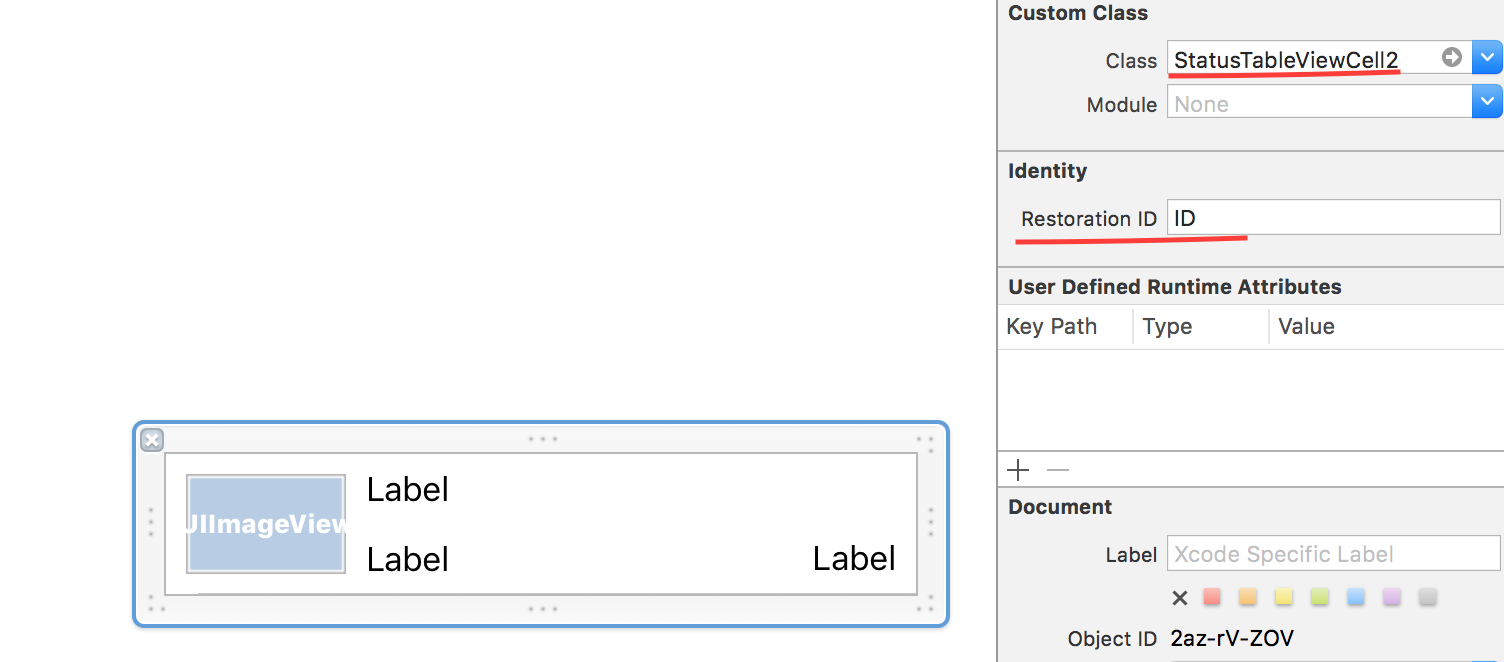
storyboard:
- 第1步:在StoryBoard中添加UITableViewController,并在其上设置UITableViewCell的相应控件。
- 第2步:在StoryBoard中设置UITableViewCell的复用ID。
- 第3步:在自定义的UITableViewCell类中提供数据模型属性,并在设置方法中将模型和控件进行绑定。
- 第4步:在UITableViewController中使用传统方式或者注册类方式进行复用优化。
自定义不等高Cell:
代码:
frame方式:
主要步骤和等高Cell的计算方式一样,主要是在计算一些具有动态宽高的控件时需要注意,同时在UITableViewController的
(CGFloat)tableView:(UITableView *) heightForRowAtIndexPath:(NSIndexPath *)中计算根据每行的不同的数据模型计算cell的高度。 例如:计算宽度为距离屏幕左右各10,高度不固定的UILabel的高度:
>
计算某个使用某字体的单行的UILable的宽高:
>
autolayout方式:
xib:
storyboard:
在storyboard设置好UITableViewCell的各控件的约束后,需要在UITableViewController中添加以下代码:
二十四、代理的使用步骤:
代理的定义:
协议名字的格式一般是:类名 + Delegate,例:UITableViewDelegate
设计细节:
(1).一般都是@optional(让代理可以有选择性去实现一些代理方法)
(2).方法名一般都以类名开头,例:
- (void)scrollViewDidScroll: (3).一般都需要将对象本身传出去,例:tableView的代理方法都会把tableView本身传出去
必须要遵守NSObject协议(基协议),例:
@protocol MyCellDelegate <NSObject>代理的声明:
代理的类型格式:id<协议> delegate
>
设置代理对象:
代理对象遵守协议,并实现协议里的方法:
代理方法的调用:
>
二十五、iOS监听事件的方法比较
- 通知(NSNotificationCenter\NSNotification)
- 任何对象之间都可以传递消息
- 使用范围
- 1个对象可以发通知给多个对象
- 1个对象可以接受多个对象发出的通知
- 要求:必须得保证通知的名字在发出和监听时是一致的
- KVO
- 仅仅是能监听对象属性的改变(灵活度不如通知和代理)
- 代理
- 使用范围
- 1个对象只能设置一个代理(假设这个对象只有1个代理属性)
- 1个对象能成为多个对象的代理
- 如何选择?
代理比通知规范- 建议使用
代理多于通知,能使用代理尽量使用代理
二十六、UIView形变:
位移形变:
>
旋转形变:
>
缩放形变:
>
透明度形变:
二十七:hitTest与pointInside方法:
- hitTest方法:-(UIView )hitTest:(CGPoint)point withEvent:(UIEvent )event
- 作用:寻找响应点击事件最合适的view
- 参数:当前手指所在的点,产生的事件
- 返回值:最合适的view,如果当前view不是最合适的view,则返回nil
- 调用时机:当事件传递给当前控件时就会调用这个控件的hitTest方法
- pointInside方法:-(BOOL)pointInside:(CGPoint)point withEvent:(UIEvent *)event
- 作用:判断事件point在不在方法调用View上
- 参数:当前手指所在的点,产生的事件
- 返回值:是否在调用View上
- 调用时机:hitTest底层会调用用这个方法
二十八、事件传递过程:
事件传递完整过程:
在产生一个事件时,系统会将该事件加入到一个由UIApplication管理的事件队列中,
UIApplication会从事件队列中取出最前面的事件,将它传递给先发送事件给应用程序的主窗口.
主窗口会调用hitTest方法寻找最适合的视图控件,找到后就会调用视图控件的touches方法来做具体的事情.
当调用touches方法,它的默认做法, 就会将事件顺着响应者链条往上传递,
传递给上一个响应者,接着就会调用上一个响应者的touches方法如何寻找上一个响应者:
- 如果当前的View是控制器的View,那么控制器就是上一个响应者.
- 如果当前的View不是控制器的View,那么它的父控件就是上一个响应者.
- 在视图层次结构的最顶级视图,如果也不能处理收到的事件或消息,则其将事件或消息传递给window对象进行处理.
- 如果window对象也不处理,则其将事件或消息传递给UIApplication对象.
- 如果UIApplication也不能处理该事件或消息,则将其丢弃.
二十九、Quartz2D:
Quartz2D是一个二维的绘图引擎,同时支持iOS和Mac系统,可以画基本线条,绘制文字,图片,截图,自定义UIView。
图形上下文:
- 图形上下文是用来保存用户绘制的内容状态,并决定绘制到哪个地方的.用户把绘制好的内容先保存到图形上下文,然后根据选择的图形上下文的不同,绘制的内容显示到地方也不相同,即输出目标也不相同.
分类:
- Bitmap Graphics Context(位图上下文)
- PDF Graphics Context
- Window Graphics Context
- Layer Graphics Context(图层上下文,自定义UIView取得上下文就是图层上下文.UIView之所以能够显示就是因为他内部有一个图层)
- Printer Graphics Context
自定义UIView的步骤:
首先得要有上下文,有了上下文才能决定把绘制的东西显示到哪个地方去.其次就是这个上下文必须得和View相关联.才能将内容绘制到View上面.
具体步骤:
1.要先自定定UIView
2.实现DrawRect方法
3.在DrawRect方法中取得跟View相关联的上下文.
4.绘制路径(描述路径长什么样).
5.把描述好的路径保存到上下文(即:添加路径到上下文)
6.把上下文的内容渲染到View
三十、CALayer:
CALayer和UIView的区别:
- CALayer和UIView都能实现相同的显示效果。
- 对比CALayer,UIView多了一个事件处理的功能。CALayer不能处理用户的触摸事件,而UIView可以。
- 所以,如果显示出来的东西需要跟用户进行交互的话,用UIView;如果不需要跟用户进行交互,用UIView或者CALayer都可以。
- 当然,CALayer的性能会高一些,因为它少了事件处理的功能,更加轻量级。
position和anchorPoint:
position:
- 用来设置CALayer在父层中的位置
- 以父层的左上角为原点(0, 0)
anchorPoint:
- 称为“定位点”、“锚点”
决定着CALayer身上的哪个点会是position属性所指的位置- 以自己的左上角为原点(0, 0)
- 它的x、y取值范围都是0~1,默认值为(0.5, 0.5)
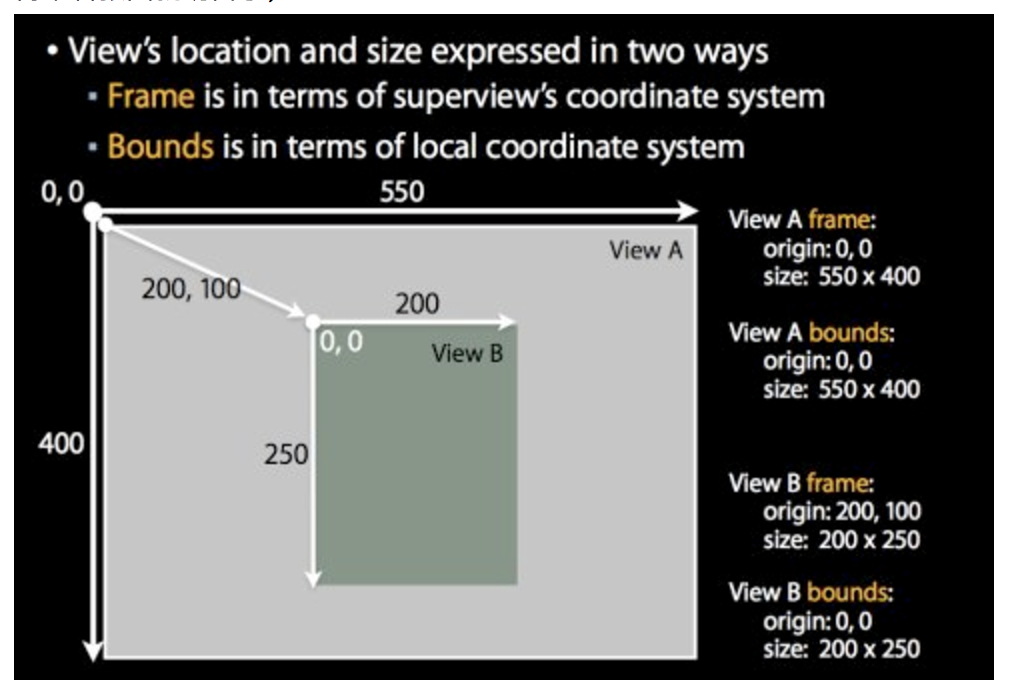
三十一、frame、bounds和center:
origin:起点位置
frame:该view在父view坐标系统中的位置和大小。(参照点是父坐标系统)
bounds:该view在本地坐标系统中的位置和大小。(参照点是本地坐标系统,就相当于ViewB自己的坐标系统,以0,0点为起点)
center:该view的中心点在父view坐标系统中的位置。(参照点是父坐标系统)
三十二、Core Animation:
Core Animation的动画执行过程都是在后台操作的,不会阻塞主线程。
Core Animation是直接作用在CALayer上的,并非UIView。
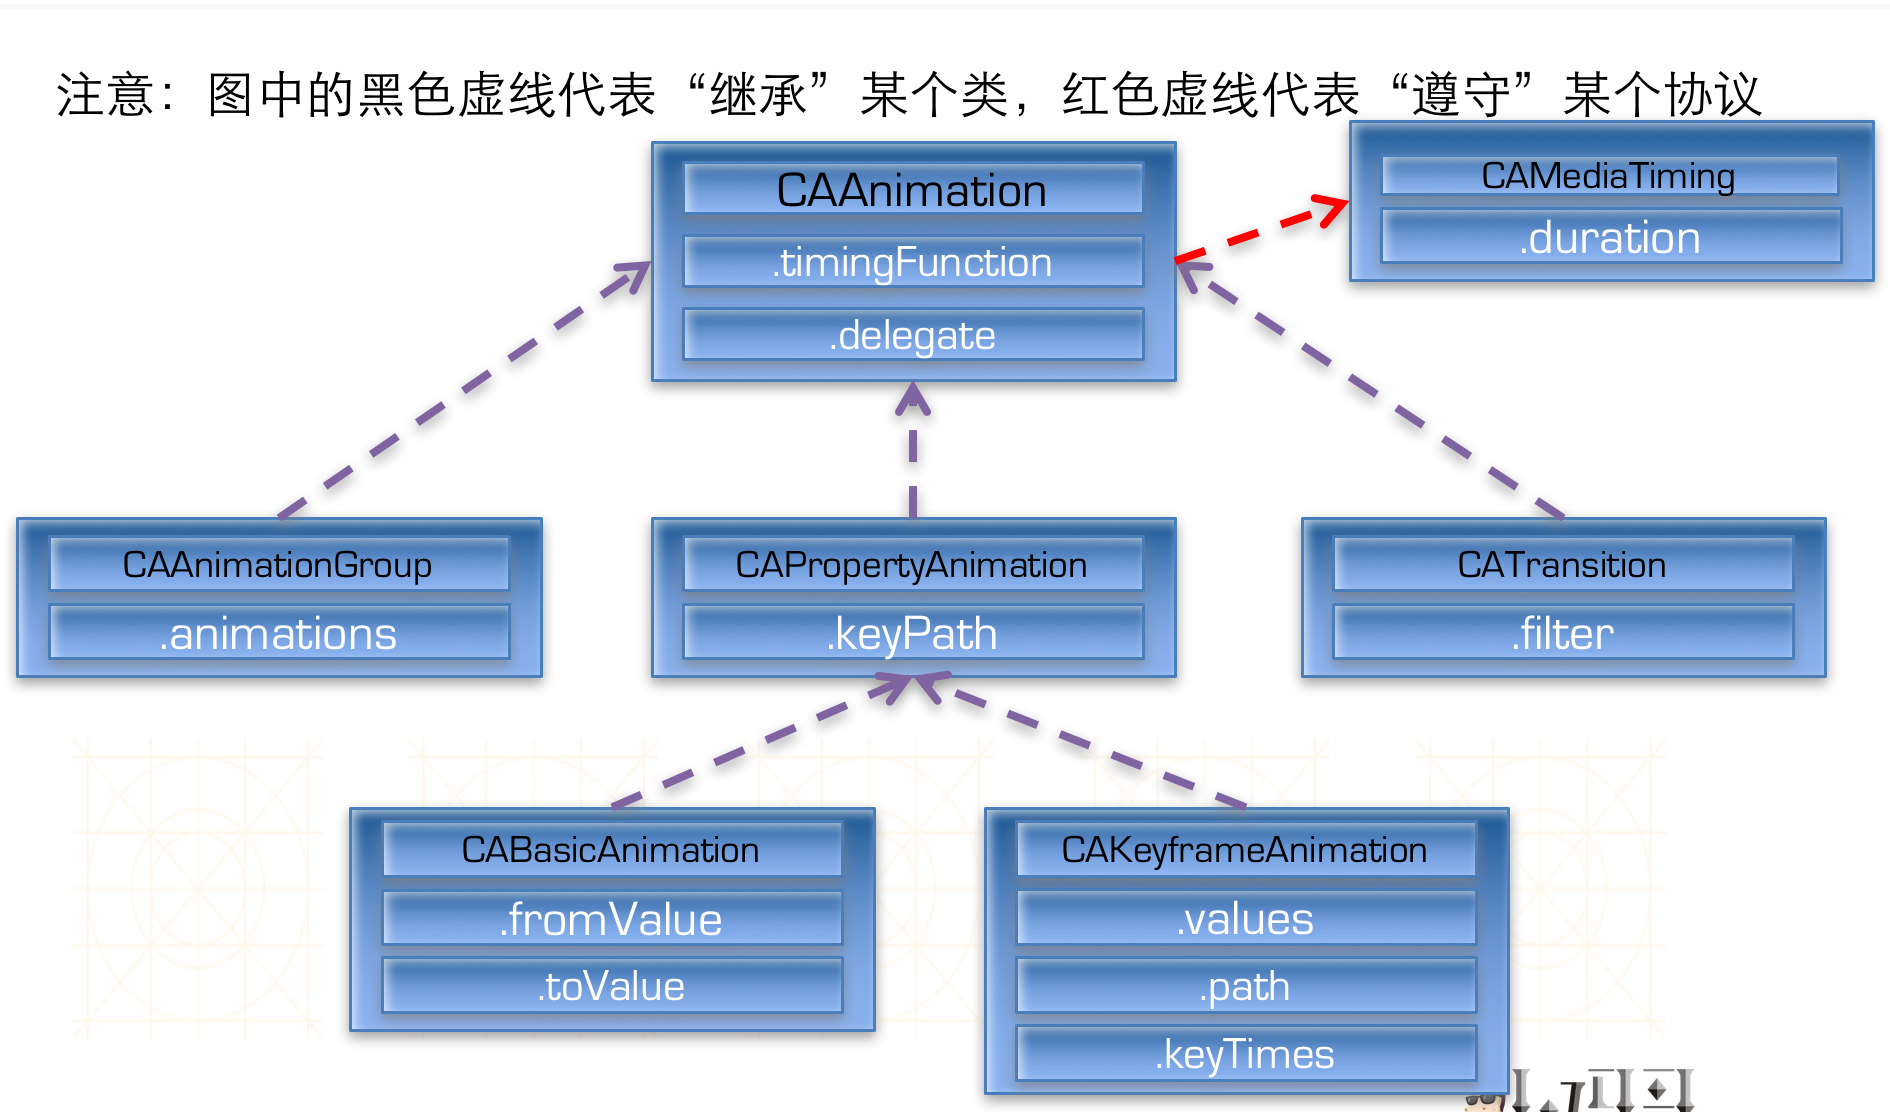
核心动画继承结构:
CABasicAnimation示例:
- 单独动画:
>
组动画:
>
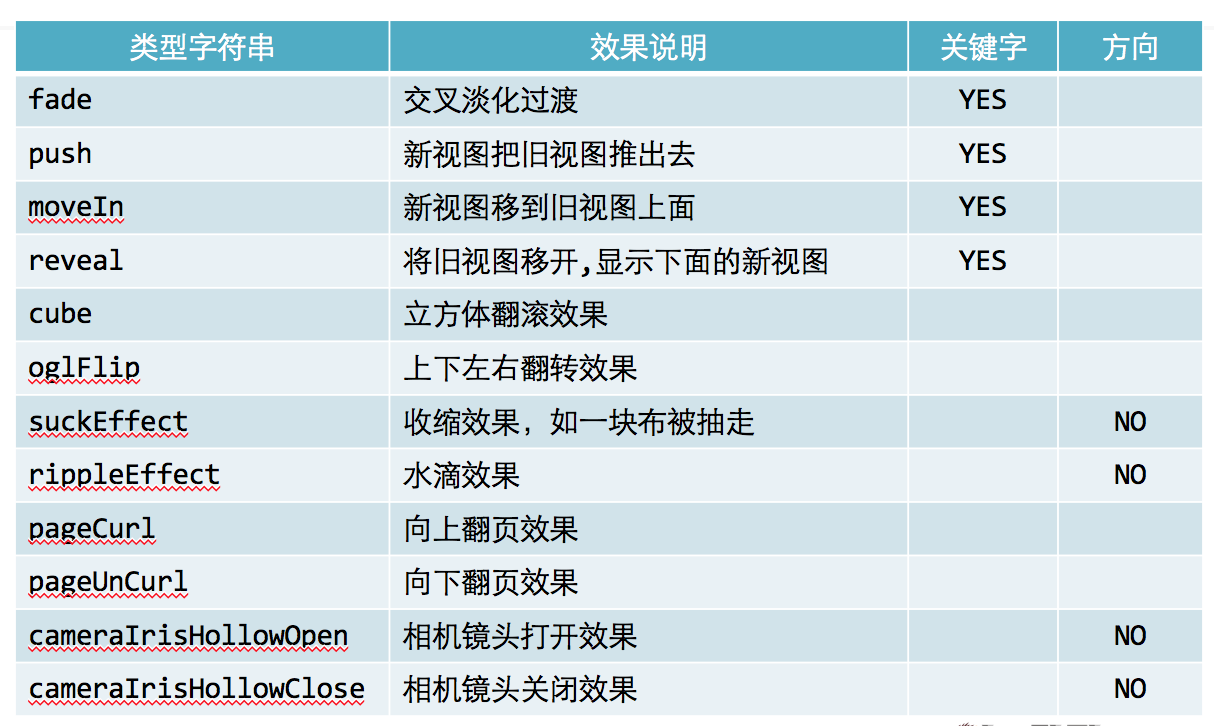
转场动画:CATransition
动画属性:
type:动画过渡类型
subtype:动画过渡方向
startProgress:动画起点(在整体动画的百分比)
endProgress:动画终点(在整体动画的百分比)
转场动画过渡效果:
三十三、UIAppearance
UIAppearance是一个协议
>
UIView默认已经遵守了这个协议
>
UIAppearance都有什么方法
>
让某一类控件同时表现某种属性
>
让某一类控件在另一种控件中同时变现某种属性
>
注意:
- appearance只有在控件显示之前设置,才有效果。
- 只有被宏UI_APPEARANCE_SELECTOR修饰才能使用appearance进行修改。
- 字体只有在Normal状态可以正常设置,否则无效。
三十四、layoutSubviews的调用时机:
- 1.直接调用[self setNeedsLayout];
- 2.addSubview的时候。
- 3.当view的size发生改变的时候。
- 4.滑动UIScrollView的时候。
- 5.旋转Screen会触发父UIView上的layoutSubviews事件。
注意:当view的size的值为0的时候,addSubview也不会调用自定义view的layoutSubviews。当要给这个自定义view添加子控件的时候不管他的size有没有值都会调用。
三十五、Block详解:
定义方式:
本地变量:
>
属性:
>
方法定义形参:
>
方法调用实参:
>
别名(typedef):
>
注意事项:
- 对于希望在block中修改的外界局部对象,我们可以给这些变量加上__block关键字修饰,这样就能在block中修改这些变量。
- block在捕获变量的时候只会保存变量被捕获时的状态(对象变量除外),之后即便变量再次改变,block中的值也不会发生改变。
- 系统提供给我们__weak的关键字用来修饰对象变量,声明这是一个弱引用的对象,从而解决了循环引用的问题。
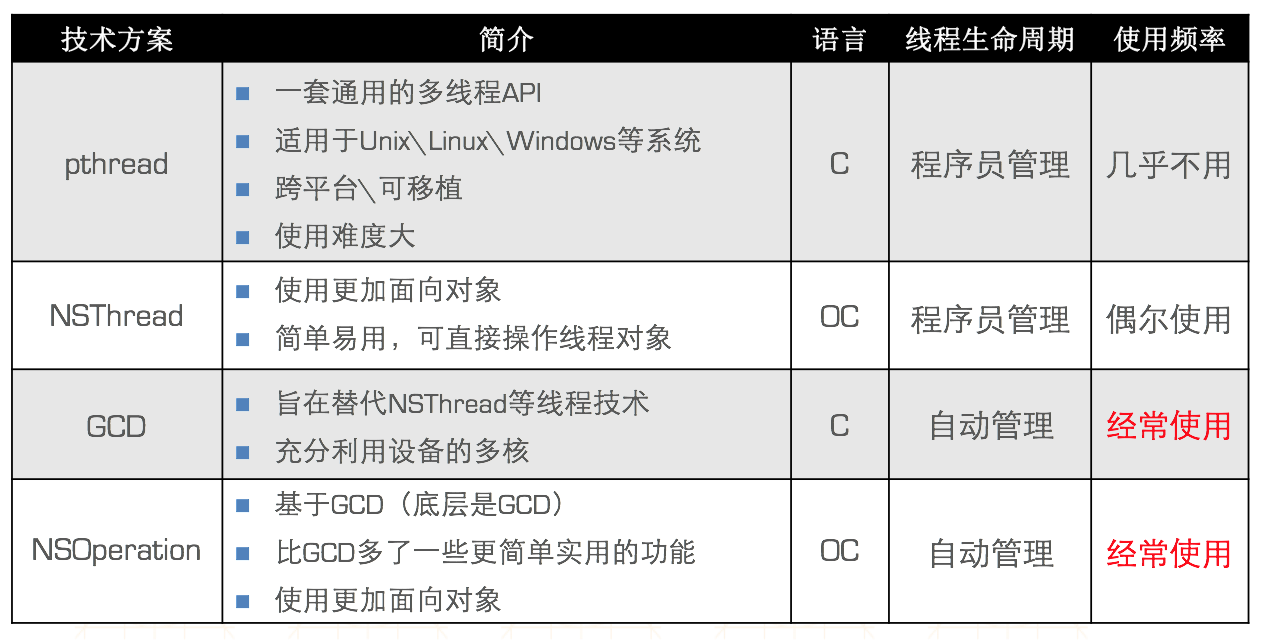
三十六、多线程
iOS中多线程的实现方案:
NSThread:
创建、启动:
>
主线程相关方法:
>
获取当前线程:
>
线程的名字:
>
其他创建线程方式:
>
控制线程状态:
>
互斥锁使用格式:
>
线程间通信:
>
实例:
>
GCD(Grand Central Dispatch):
GCD使用步骤:
a.定制任务
b.将任务添加到队列中
执行任务:
a.用同步的方式执行任务:
>
b.用异步的方式执行任务:
>
dispatch_barrier_async函数:
>
注意:a.在前面的任务队列执行结束后它才执行,而且它后面的任务队列必须等它执行完成之后才会执行 b.这个queue不能是全局的并发队列
创建队列:
>
创建并发队列:
>
创建串行队列:
>
线程间通信示例:
>
延时执行:
>
一次性代码:
>
快速迭代:
>
队列组:
>
实例:
>
NSOperation:
NSOperation实现多线程的具体步骤:
a.先将需要执行的操作封装到一个NSOperation对象中
b.然后将NSOperation对象添加到NSOperationQueue中
c.系统会自动将NSOperationQueue中的NSOperation取出来
d.将取出的NSOperation封装的操作放到一条新线程中执行
使用NSOperation子类的方式有3种(
NSOperation是个抽象类,并不具备封装操作的能力,必须使用它的子类) a.NSInvocationOperation
>
b.NSBlockOperation
>
c.自定义子类继承NSOperation,实现内部相应的方法
>
最大并发数:
>
队列的取消、暂停、恢复:
>
操作依赖:NSOperation之间可以设置依赖来保证执行顺序
>
操作的监听
>
自定义NSOperation
a.实现步骤:
重写-(void)main方法,在里面实现需要执行的任务
b.注意点:
自己创建自动释放池(因为如果是异步操作,无法访问主线程的自动释放池)
经常通过-(BOOL)isCancelled方法检测操作是否被取消,对取消做出响应
实例:
>
三十七、SDWebImage使用:
设置imageView的图片
>
设置图片并计算下载进度
>
系统级内存警告如何处理
>
判断图片类型
>
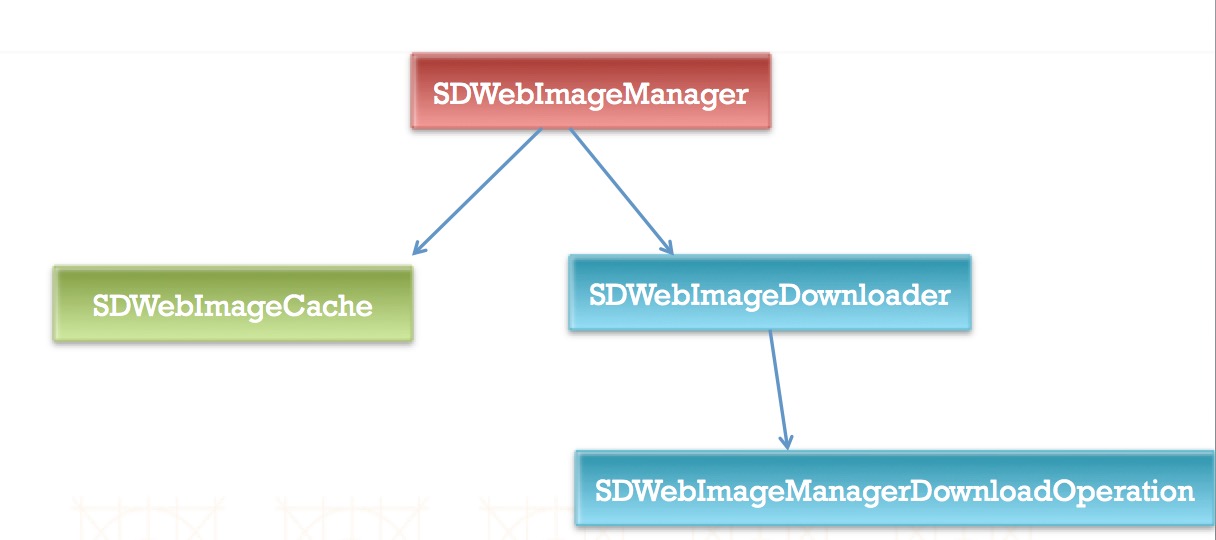
SDWebImage内部结构
其他说明:
- SDWebImage默认的缓存时间是1周
- SDWebImage做沙盒缓存时图片的命名机制是拿到图片的URL后直接对URL进行MD5加密
- SDWebImage图片的下载顺序,默认是先进先出的
- SDWebImage当接收到内存警告之后,内部会自动清理内存缓存
- SDWebImage队列最大并发数为6
- SDWebImage内部设置下载图片超时时间为15m
- SDWebImage图片下载操作使用了NSURLConnection类发送网络请求实现
- SDWebImage内部使用NSCache类来进行缓存处理
三十八、单例模式:
单例演示:
- SingleInstance.h
>
SingleInstance.m
>
单例宏:
- 代码:
>
使用:
三十九、常见响应状态码:
状态码 英文名称 中文描述 200 OK 请求成功 400 Bad Request 客户端请求的语法错误,服务器无法解析 404 Not Found 服务器无法根据客户端的请求找到资源 500 InternalServer Error 服务器内部错误,无法完成请求
四十、RunLoop:
RunLoop对象
iOS中有2套API来访问和使用RunLoop
- Foundation:NSRunLoop
- Core Foundation:CFRunLoopRef
NSRunLoop和CFRunLoopRef都代表着RunLoop对象。
NSRunLoop是基于CFRunLoopRef的一层OC包装,所以要了解RunLoop内部结构,需要多研究CFRunLoopRef层面的API(Core Foundation层面)。
RunLoop与线程
- 每条线程都有唯一的一个与之对应的RunLoop对象
- 主线程的RunLoop已经自动创建好了,子线程的RunLoop需要主动创建
- RunLoop在第一次获取时创建,在线程结束时销毁
获得RunLoop对象
Foundation:
>
Core Foundation:
>
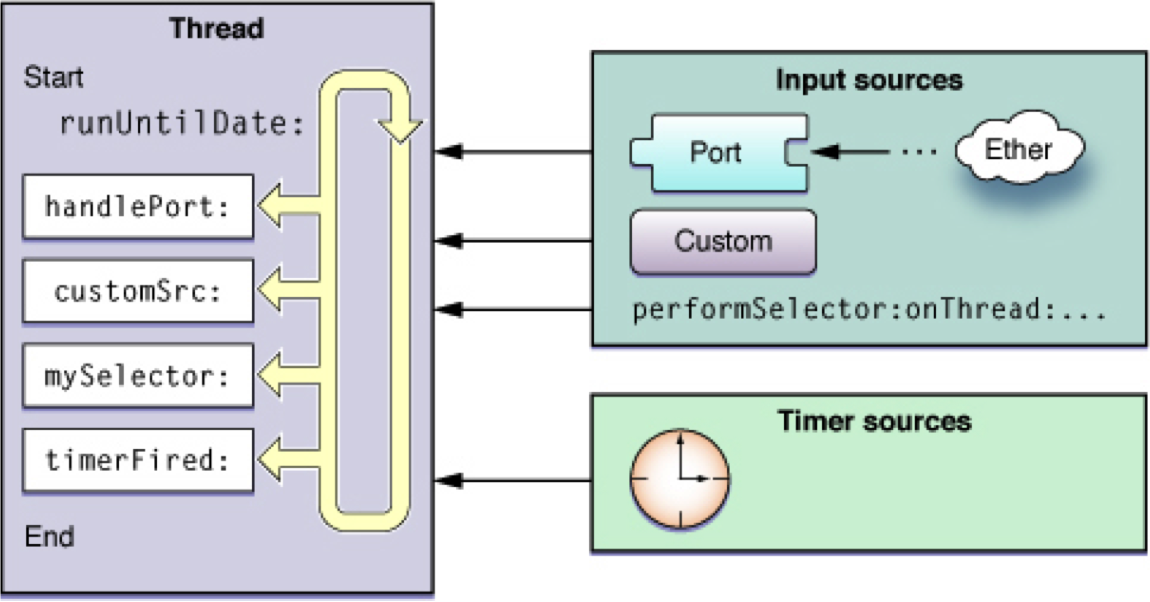
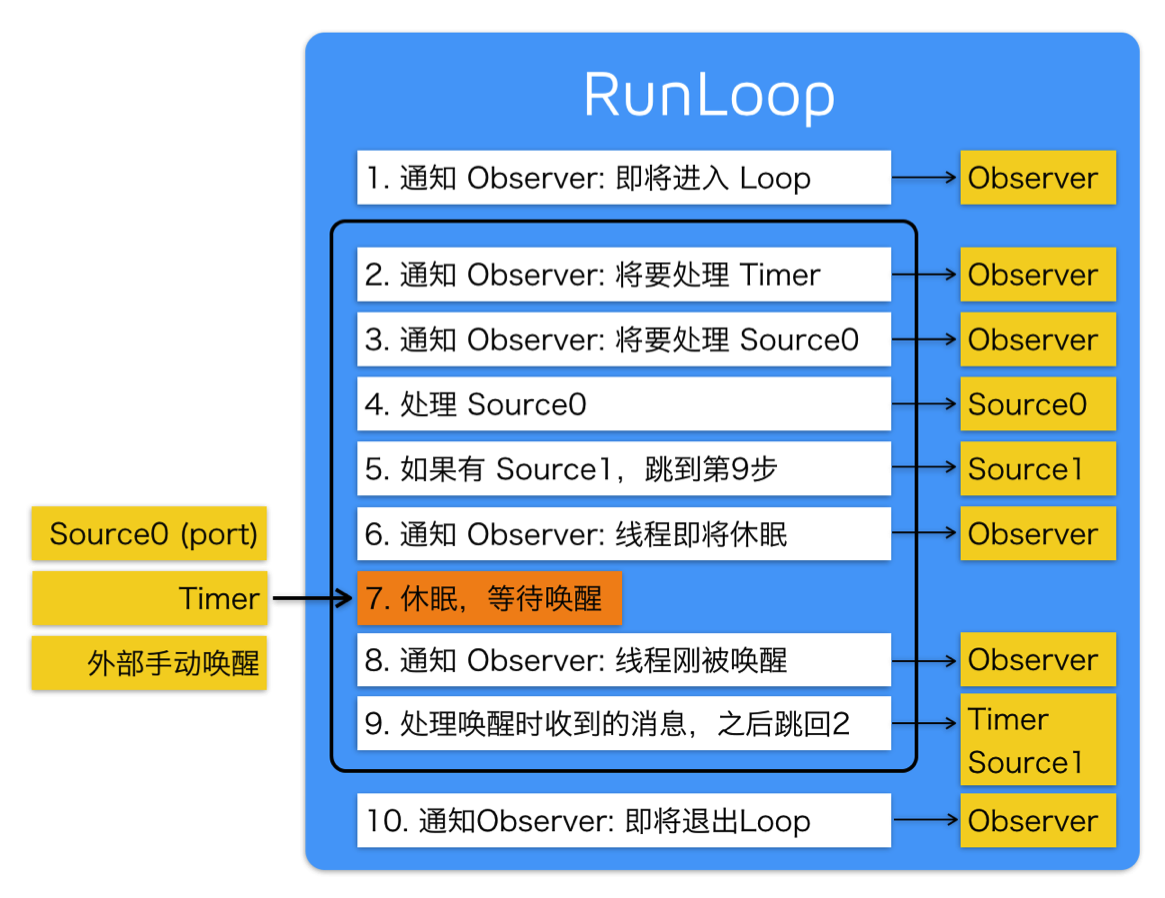
Runloop运行原理图
五个相关的类
>
Runloop和相关类之间的关系图
- 在Runloop中有多种运行模式,但Runloop只能选择一种模式运行; Mode里面至少有一个Timer或者Source,Observer用来监听Runloop的状态。
CFRunloopModeRef

>
CFRunloopTimerRef
(1) NSTimer两种使用方式的相关代码:
>
如果从子线程启动NSTimer,则需要手动启动中NSRunLoop,主线程如上,不用手动启动NSRunLoop
>
GCD中的定时器
>
GCD定时器补充
>
CFRunloopSourceRef
- 是事件源也就是输入源,有两种分类模式: 一种是按照苹果官方文档进行划分的 另一种是基于函数的调用栈来进行划分的(source0和source1)。
- Source0:非基于Port的,Source1:基于Port的
- 可以通过打断点的方式查看一个方法的函数调用栈
CFRunLoopObserverRef
CFRunLoopObserverRef是观察者,能够监听RunLoop的状态改变
监听实现:
>
监听的状态
>
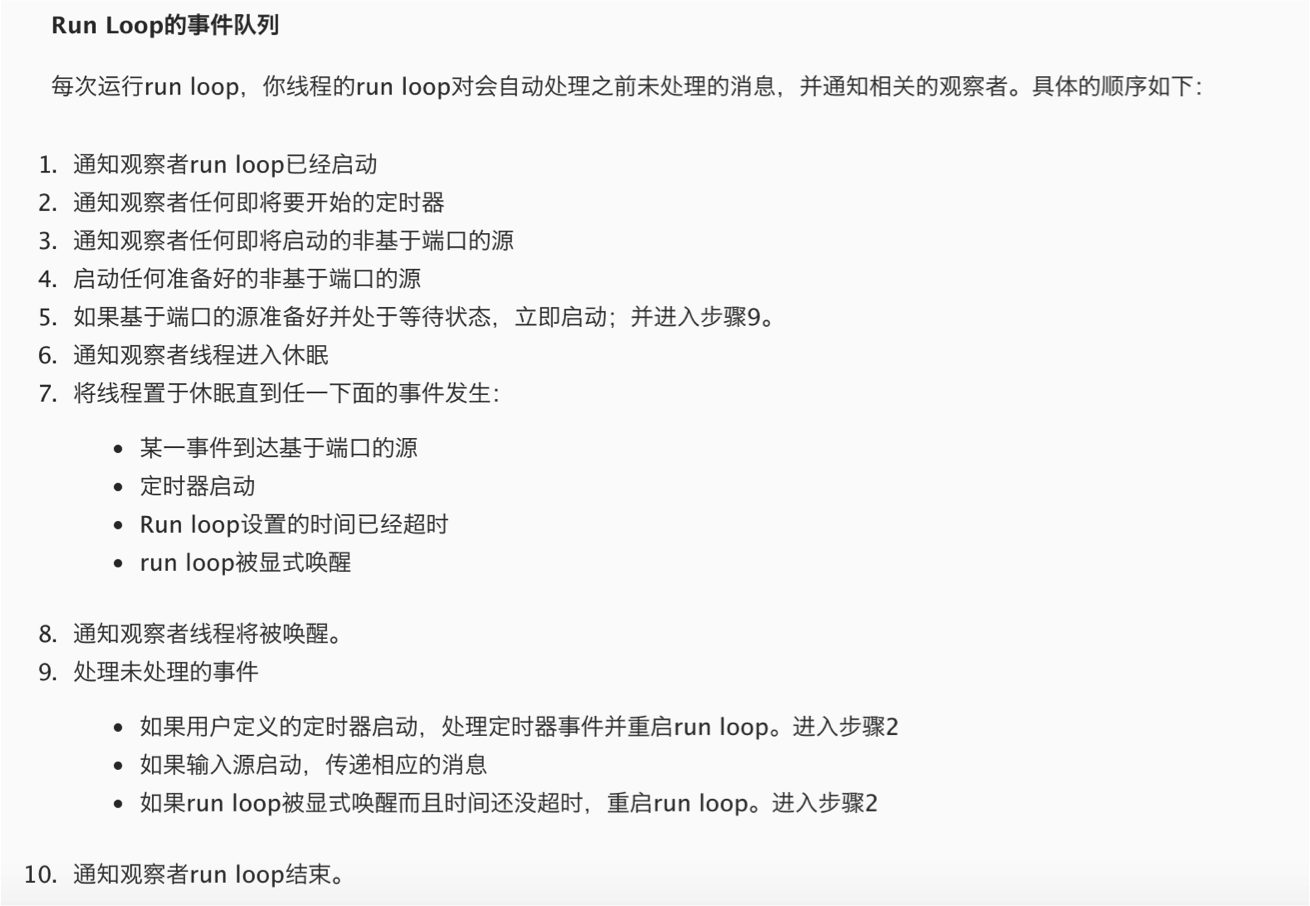
Runloop运行逻辑
Runloop应用:
四十一、Json和Xml数据解析:
Json数据解析:
常用解析方案:
- 第三方框架:JSONKit、SBJson、TouchJSON(性能从左到右,越差)
- 苹果原生(自带):NSJSONSerialization(性能最好)
NSJSONSerialization的常见方法
- JSON数据—>OC对象
>
* OC对象—>JSON数据
>
Xml数据解析:
- 常用解析方案:
- 苹果原生:NSXMLParser,SAX方式解析,使用简单
- NSXMLParser使用:
>
NSXMLParserDelegate:
四十二、NSURLSession
使用介绍:
使用步骤:
使用NSURLSession创建task,然后执行task
Task介绍:
a.NSURLSessionTask是一个抽象类,本身不能使用,只能使用它的子类
b.NSURLSessionDataTask\NSURLSessionUploadTask\NSURLSessionDownloadTask
NSURLSession的基本使用
- 发送get请求
>
发送post请求
>
- NSURLSession下载文件-代理(NSURLSessionDataDelegate)
>
- 使用NSURLSessionDownloadTask实现大文件下载-监听下载进度
>
实现断点下载相关代码
>
计算当前下载进度
>
注意点:
a. 将已下载的追加写到本地文件中
b. 下次请求数据时指定从哪个地方开始下载文件数据
>
NSURLSession对象的释放
>
- NSURLSession实现文件上传
实现文件上传的方法
>
设置代理,在代理方法中监听文件上传进度
>
- 关于NSURLSessionConfiguration相关
四十三、Reachability
- 使用步骤:
- 添加框架 SystemConfiguration.framework
- 添加源代码:Reachability.h、Reachability.m
- 包含头文件:import “Reachability.h”
- 常见用法:
>
- 网络监控:
四十四、AFNetworking
>
四十五、设置应用使用HTTP访问:
- 打开 工程主目录下info.plist->增加属性字典 App Transport Security Settings->在这个属性下增加节点 Allow Arbitrary Loads, value 为 YES

四十六、NSInvocation的基本使用
简介:
- 在 iOS中可以直接调用某个对象的消息方式有两种:
- 一种是 performSelector:withObject
- 一种就是 NSInvocation
>
四十七、NSInputStream、NSOutputStream的简单使用:
四十八、类扩展、分类、协议:
类扩展:
作用:
- 能为某个类附加额外的属性,成员变量,方法声明
- 一般的类扩展写到.m文件中
- 一般的私有属性写到类扩展
使用格式:
>
分类:
与类扩展的区另:
- 分类的小括号中必须有名字
- 分类只能扩充方法,不能扩展属性和成员变量(如果包含成员变量会直接报错)
- 如果分类中声明了一个属性,那么分类只会生成这个属性的set、get方法声明,也就是不会有实现
使用格式:
>
协议:
作用:
- 定义一套公用的接口(Public)
>
* 委托代理(Delegate)传值
定义格式:
附录一:常用第三方框架
- Masonry:是iOS控件布局中经常使用的一个轻量级AutoLayout框架。
- MBProgressHUD:是一个表示进度的loading视图和两个可选的文本提示的HUD窗口。
- MJExtension:是一个字典转模型框架。
- SDWebImage:是一个带缓存的异步的图片下载的UIImageView的分类。
- ZipArchive:是一个解压缩框架。
- AFNetworking:是一个网络框架。
- FMDB:是一个对Sqlite操作进行封装的框架。
- FLAnimatedImage:是一个iOS的gif动画库。
- LocationManager:是一个简单的iOS定位库。
- ijkplayer:B站开源的视频播放器,支持Android和iOS。
- CocoaLumberjack:是一个iOS的日志框架。
附录二:常用宏
获取屏幕宽度与高度:
123456789空值判断宏:
1234567#define kStringIsEmpty(str) ([str isKindOfClass:[NSNull class]] || str == nil || [str length] < 1 ? YES : NO )#define kArrayIsEmpty(array) (array == nil || [array isKindOfClass:[NSNull class]] || array.count == 0)#define kDictIsEmpty(dic) (dic == nil || [dic isKindOfClass:[NSNull class]] || dic.allKeys == 0)#define kObjectIsEmpty(_object) (_object == nil \|| [_object isKindOfClass:[NSNull class]] \|| ([_object respondsToSelector:@selector(length)] && [(NSData *)_object length] == 0) \|| ([_object respondsToSelector:@selector(count)] && [(NSArray *)_object count] == 0))常用缩写:
12345尺寸宏:
12345打印宏:
12345系统宏:
123456789101112131415161718//获取版本//获取当前语言//判断是真机还是模拟器//iPhone Device//iPhone Simulator//检查系统版本内存宏:
123456//使用ARC和不使用ARC//compiling with ARC// compiling without ARC图片宏:
12345678910//读取本地图片//定义UIImage对象//设置view圆角和边框[View.layer setCornerRadius:(Radius)];\[View.layer setMasksToBounds:YES];\[View.layer setBorderWidth:(Width)];\[View.layer setBorderColor:[Color CGColor]]颜色宏:
1234567891011121314// rgb颜色转换(16进制->10进制)//带有RGBA的颜色设置// 获取RGB颜色//背景色//清除背景色其他宏:
|
|